There were times when I was frustrated and totally drained but in the end, I had a lot of fun making this video. The following are things I'll keep in mind for any future claymation or stopmotion work.
-Use MagpiePro for audio syncing-this is great software!
-Never use a mirror-it's not easy to control what's in the reflections!
-Invest time and money in highly functional puppets-so it's not wasted later!
I eventually discovered that my puppets could not do everything I wanted them to...I think the bottom line is that more advanced movement (anything which uses the full body and requires some sort of balance, such as walking) is easier to create with more advanced puppets or at least puppets with bigger feet!
-Be flexible and willing to change your vision when things go wrong-they will!
-Don't be afraid to use Photoshop to edit out supports or anything else that makes it way into the frame unintentionally-I didn't use Photoshop for this project but I understand how helpful it could be and how much more I could do if I was willing to put in the time later to edit out how I did it.
Things I'd like to try:
-Making a puppet walk successfully/making better balanced puppets
-Using a higher frame rate (>15 fps) for more refined movement
-Animating an original storyline with original audio
-Making more believable puppet eyes-I got lazy with the eyes simply because they were so annoying to change.
-Animating without replaceable mouths-that's all I ended up using on this project.
Monday, May 24, 2010
DONE!
You can view the final video here:
http://www.youtube.com/watch?v=b9KgWRwfX8A
Yep, it's finally done. I overcame the frustration I was feeling, shortened the audio track, and redid sections that needed to be redone. I didn't get to tell Gertrude's whole story as I had initially planned, but I feel that I was able to hit the most important point: Gertrude's little tail is just right for her kind of bird.
Lip-syncing is what I enjoyed most about this whole project, just matching character faces to the audio to create believable animation sequences. So, I decided to focus more on the characters actually SAYING the words rather than trying to create dramatic body movement TO the words. After I changed my focus to that, the process of shooting went much faster. The majority of the finished piece was shot in about five days. I also found a Cat in the Hat bobblehead doll that I already had which I was able to use for Doctor Dake. In Seussical the Musical, Dr. Dake is played by the Cat in the Hat and I was planning to make a puppet but was very happy I didn't have to do that. I gave the bobblehead a sort of doctor disguise and used replacement mouths to create the animation. The mouths I used were taken from a MagpiePro tutorial cartoon and they worked out great.
 The doctor's office was a very simple set as you can see. I was able to reuse certain elements from Gertrude's room such as the furniture, the flower vase, the floor, and the BirdGirl magazine.
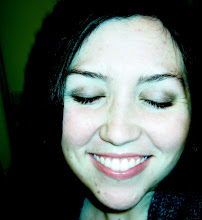
 This picture was taken by accident as I was blazing through a scene in the doctor's office. This sort of head movement was done between each shot in addition to changing the mouth if necessary and moving the arms, etc. I just didn't move my hand out of the way fast enough before I snapped this photo!
 This picture shows the flying scene setup. I hung a dowel rod from the chandelier which had two loops of fishing line taped to it. One loop of fishing line was placed around Gertrude under her wings/armpits. The other loop was placed around Gertrude's waist just above her legs. The clouds were on a long piece of bulletin board paper. Each end of the cloud paper was taped to a roll of wrapping paper. Allan helped by turning the wrapping paper rolls a small amount after each picture was taken. The right to left movement of the cloud paper created the illusion of Gertrude moving left to right. I moved her wings up and down after each shot as well and changed her mouth when necessary. The reason for this setup was that it was relatively simple and because Gertrude's center needed to be virtually motionless in order to create believable movement. If I had tried to move Gertrude left to right in addition to moving her wings up and down the overall effect would have been too jerky.
http://www.youtube.com/watch?v=b9KgWRwfX8A
Yep, it's finally done. I overcame the frustration I was feeling, shortened the audio track, and redid sections that needed to be redone. I didn't get to tell Gertrude's whole story as I had initially planned, but I feel that I was able to hit the most important point: Gertrude's little tail is just right for her kind of bird.
Lip-syncing is what I enjoyed most about this whole project, just matching character faces to the audio to create believable animation sequences. So, I decided to focus more on the characters actually SAYING the words rather than trying to create dramatic body movement TO the words. After I changed my focus to that, the process of shooting went much faster. The majority of the finished piece was shot in about five days. I also found a Cat in the Hat bobblehead doll that I already had which I was able to use for Doctor Dake. In Seussical the Musical, Dr. Dake is played by the Cat in the Hat and I was planning to make a puppet but was very happy I didn't have to do that. I gave the bobblehead a sort of doctor disguise and used replacement mouths to create the animation. The mouths I used were taken from a MagpiePro tutorial cartoon and they worked out great.
 The doctor's office was a very simple set as you can see. I was able to reuse certain elements from Gertrude's room such as the furniture, the flower vase, the floor, and the BirdGirl magazine.
 This picture was taken by accident as I was blazing through a scene in the doctor's office. This sort of head movement was done between each shot in addition to changing the mouth if necessary and moving the arms, etc. I just didn't move my hand out of the way fast enough before I snapped this photo!
 This picture shows the flying scene setup. I hung a dowel rod from the chandelier which had two loops of fishing line taped to it. One loop of fishing line was placed around Gertrude under her wings/armpits. The other loop was placed around Gertrude's waist just above her legs. The clouds were on a long piece of bulletin board paper. Each end of the cloud paper was taped to a roll of wrapping paper. Allan helped by turning the wrapping paper rolls a small amount after each picture was taken. The right to left movement of the cloud paper created the illusion of Gertrude moving left to right. I moved her wings up and down after each shot as well and changed her mouth when necessary. The reason for this setup was that it was relatively simple and because Gertrude's center needed to be virtually motionless in order to create believable movement. If I had tried to move Gertrude left to right in addition to moving her wings up and down the overall effect would have been too jerky.
Tuesday, March 16, 2010
Updates...


Now that I've had a taste of every step of this process, I can tell you that every single step has taken longer than I thought it would. One of the problems that I'm having now is that the Gertrude and Mayzie puppets are cracking for some reason. The clay is not holding up as expected and even after adding more new clay to try to fix the cracks, new ones continue to form. This is confusing because the bird girls have held up perfectly fine and I used the same method to build Gertrude and Mayzie. I think it may have to do with the thin copper wire holding the foam on, but I am hesitant to take them totally apart. And so for now, while taking pictures I have to constantly worry about smoothing cracks as well; it's a nuisance.
After shooting a few animation sequences I have discovered that if I don't write out very detailed actions for each frame on the frame sheet that I easily get lost. Unfortunately this takes extra time prior to shooting. Additionally, much of what I'm actually doing is at least partially guesswork. This means that if something I think will work does not and I only find that out after it's already been done, extra time must be spent to fix whatever the problem is. I find the redo process to be especially draining.
All of the negatives aside...it's spring break! And I'll be spending some serious time working out the kinks in this project and hopefully getting a lot of good work done!
Monday, February 15, 2010
Animation!
The first 18 seconds of footage have been shot! The zoom into Gertrude's room is 12 seconds long and is the video to accompany the musical intro to the first song. In Gertrude's room, she's starting her morning, adjusting her bow in the mirror and singing "Dee doooooooo, dee dooooooooooo, dee doooooo, do do do doooooo..." I hope you can see the video clips. They are unedited and without sound. Using the mirror proved to be quite challenging and I am visible in some shots. Those shots will of course have to be edited. I have played the clip along with the music on my computer and it lines up very well but there's absolutely no way that would have happened without Magpie Pro! That software was SO worth it!
Gertrude's Room and Jungle House!


Gertrude's room and jungle house were made primarily from foam board, fabric, cardboard, cling wrap, fake flowers, and oven-bake clay. Her house is meant to be a strange-looking tree not a mushroom! The two smaller mirrors above her dresser were replaced by one larger mirror to better facilitate shots where the reflection will be used.
Gertrude and Mayzie!


Gertrude and Mayzie puppets are done! Overall construction was very similar to the bird girls except that these two were a little taller. Gertrude was intentionally made skinny and awkward and Mayzie had some enhanced features to emphasize her superficiality and high-maintenance attitude.
Sunday, January 31, 2010
Bird Girls!
The first three puppets I decided to make were the bird girls who function sort of as chorus girls or backup singers in the story. I did this because they are relatively minor characters and I assumed there might be a learning curve to the whole puppet-making process. I was right. I wanted to keep these three bird girls pretty similar overall but with different colored feathers. A picture of my puppet-making station is below along with the yellow bird girl who was the first one I completed. Overall I thought that she was too thick around the middle and in her thighs, her feet were too big, and her armature too stiff.

The other two bird girls were made the same basic way as the first but with a few minor adjustments. The method I used was outlined in both Priebe's and Brierton's books and seemed by far to be the most economical. The armature was made of aluminum wire, sturdy yet flexible.

I used some five minute epoxy to secure the most fragile portions of the armature. On the first bird girl I used more epoxy than I did on these two and that's why she is so stiff! For these characters that much epoxy was not necessary.

The aluminum-epoxy bones were covered with lightweight foam secured with a thinner gauge copper jewelry wire and some hot glue when needed. This step was important in making the puppets as light as possible. The heads were made of styrofoam balls hotglued into place with indented eye sockets.
 After that, each frame was covered with plasticine skin. Plasticine is the type of oily modeling clay that never dries out but is still quite stiff at room temperature. That's what's so heavy and so I used the least amount possible. Head and tail feathers were added in addition to plasticine eyes, seed bead pupils, and embroidery thread eyelashes.

Beaks of different expressions were made for each bird girl with Sculpey (polymer clay that gets hard when you bake it in your home oven). Plasticine accents were added to the baked beaks to enhance each expression.

The pink and green bird girls wearing their 'rest' beaks. Each Sculpey beak was poked with a toothpick before baking so that after baking they can be easily interchanged when a toothpick is attached to the bird girl's face. Below are the ranges of expression for each of the bird girls. Each girl has her own set of beaks but it is nearly identical to the other two sets.


The other two bird girls were made the same basic way as the first but with a few minor adjustments. The method I used was outlined in both Priebe's and Brierton's books and seemed by far to be the most economical. The armature was made of aluminum wire, sturdy yet flexible.

I used some five minute epoxy to secure the most fragile portions of the armature. On the first bird girl I used more epoxy than I did on these two and that's why she is so stiff! For these characters that much epoxy was not necessary.

The aluminum-epoxy bones were covered with lightweight foam secured with a thinner gauge copper jewelry wire and some hot glue when needed. This step was important in making the puppets as light as possible. The heads were made of styrofoam balls hotglued into place with indented eye sockets.
 After that, each frame was covered with plasticine skin. Plasticine is the type of oily modeling clay that never dries out but is still quite stiff at room temperature. That's what's so heavy and so I used the least amount possible. Head and tail feathers were added in addition to plasticine eyes, seed bead pupils, and embroidery thread eyelashes.
Beaks of different expressions were made for each bird girl with Sculpey (polymer clay that gets hard when you bake it in your home oven). Plasticine accents were added to the baked beaks to enhance each expression.

The pink and green bird girls wearing their 'rest' beaks. Each Sculpey beak was poked with a toothpick before baking so that after baking they can be easily interchanged when a toothpick is attached to the bird girl's face. Below are the ranges of expression for each of the bird girls. Each girl has her own set of beaks but it is nearly identical to the other two sets.


Subscribe to:
Posts (Atom)